English
 Español
 Français
 Deutsch
Can I use SKX Open/Advance in my project?
To know if ZN1RX-SKXOPEN can be used in your project, you should check the following:
- Serial Port Baud Rate: 1200, 2400, 4800, 9600 or 19200 bps.
- Length of the RS232 protocol frame:
- SKX Open: up to 10 bytes.
- SKX Advance: up to 29 bytes.
- Number and type of KNX objects needed:
- SKX Open: 48 objects of 1 bit.
- SKX Advance: 65 objects (40 of 1 bit, 20 of 1 byte, y 5 of 14 bytes).
- Checksum type if needed: this is only allowed with the SKX Advance:
- Parity word (XOR byte by byte)
- Modular sum (module 256).
- Modular sum complemented (2’s complement).
- CRC-8
- CRC-16
- Acknowledgement frames (ACK): they are only allowed with the SKX Advance (5 bytes).
It must be taken into account that this device has been designed for the control of audio and video devices, not as a communication interface.
Can I use ZN1RX-SKXOPEN with a protocol different from RS232, for example, RS485?
No, ZN1RX-SKXOPEN only supports the RS232 protocol. However, sometimes, using an adaptor for RS232 and another protocol (such as RS485), it can be controlled with SKX-OPEN
En ocasiones, empleando un adaptador entre RS232 y otro protocolo (por ejemplo, RS485), se ha podido realizar el control
What are the differences between SKX Open and SKX Advance? How can I know which application program I need for my project?
SKX Open and SKX Advance are two different application programs that share the same hardware device whose reference is ZN1RX-SKXOPEN.
The choice of the application program depends on the features of the RS232 protocol and the communication objects you need on the KNX side.
The main differences between the two application programs are shown in the next table:
| SKX OPEN | SKX ADVANCE | |
| Number of Objects | 48 | 65 |
| Object Types | 1 bit | 1 bit (40 objects) 1 Byte (20 objects) 14 Bytes (5 objects) |
| Frame Type | Fixed | Variables (depending on the object value |
| Frame Length | Up to 10 bytes (20 hexadecimal characters) | Up to 29 bytes (58 hexadecimal characters) |
| Frames Acknowledgement | The whole message must match | Just acknowledgement of indicated parts (omission of the rest) |
| Checksum | No | Yes |
| Confirmation (ACK) | No | Yes |
What type of connector is delivered along with ZN1RX-SKXOPEN?
ZN1RX-SKXOPEN is delivered along with a female DB9connector (originally DE-9).
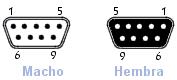
| Pin number | Description |
| 1 | CD: Carrier Detect |
| 2 | RXD: Receive Data |
| 3 | TXD: Transmit Data |
| 4 | DTR: Data Terminal Ready |
| 5 | GND: Signal Ground |
| 6 | DSR: Data Set Ready |
| 7 | RTS: Ready To Send |
| 8 | CTS: Clear To Send |
| 9 | RI: Ring Indicator |
| Shield |
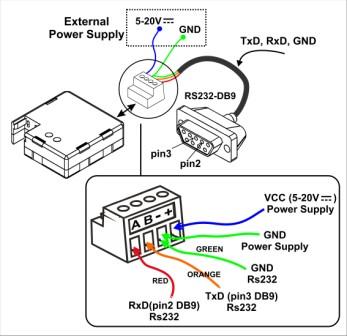
Does ZN1RX-SKXOPEN require an external power supply?
ZN1RX-SKXOPEN does not require an external power supply, it only needs the KNX bus power to work; however, the RS232 bus must be powered independently of the KNX bus. The required power is usually obtained from the terminal equipment connected to the serial bus, but sometimes an external power supply is needed.
Bus RS232 - supply voltage: 5 - 20 VDC
Connections scheme:
How must be interpreted the light signals of the programming LED?
- Fixed red: ZN1RX-SKXOPEN in programming mode.
- Flashing red: ZN1RX-SKXOPEN in safe mode.
- Green: it indicates the existence of communication through RS232 port.
Can I use ASCII characters when configuring SKX Open/Advance?
No, SKX Open/Advance must be configured only with hexadecimal characters (0-9 AD).
How can I translate the ASCII characters into hexadecimal encoding?
On the Internet, it is possible to find plenty of links with tables showing the correspondence between ASCII characters and its hexadecimal encoding.
How can I configure frames longer than 10 bytes (20 hexadecimal characters) in the SKX Advance?
To configure frames longer than 10 bytes in the SKX Advance, they must be used the extensions available in the “FRAME CONFIGURATION” tab. These subframes are added to the 10 byte main frame automatically at the time of transmission. By using these subframes, it’s possible to configure frames of up to 29 bytes.
For more information on using these subframes, see the section 2.2.2.Special frames in the device manual.
Do you have any sample project that can be used as reference to configure my ZN1RX-SKXOPEN?
Yes, in the SUPPORT section of the website of Zennio, within the area of Project Examples, Gateways section, there are available some very well documented projects that can be used as a guide for setting the ZN1RX-SKXOPEN devices.
My ZN1RX-SKXOPEN does not communicate with the device, what can I do?
- Adjust the communication settings properly: velocity (baud), parity, time between frames to be sent, reception complete mode and time out. These parameters must match the specifications of the RS232 protocol of the device controlled.
- Check the RS232 port connection, the correspondence between pins, and if there is power at the terminals + and -.
- Adjust the Time out parameter properly to ensure the correct reception of the frames. See the section 2.1 Communication configuration in the manual of the SKX Advance.
- Link the error objects to group addresses and monitor them during the communication to detect possible errors. In the manuals of the devices you can find a description of each type of error and how to fix it:
- If you have a RS232 port on your computer or an adapter, with the appropriate software that can be easily found on the Internet, you can monitor the RS232 communication to make sure that the ZN1RX-SKXOPEN is sending the appropriate frames, as well as the format of frames transmitted by the device to be integrated.
If the issue is not solved following the above indications, contact our Online Technical Support.
Zennio, Innovation and Versatility
Our products are innovative and versatile. Several products in our catalogue offer the possibility to download on them different Application Programs depending on the funcionality required in the installation.
A brief summary of the possibilities is shown next:
Ref: "ZN1VI-TP38" Touch Panel Z38
- InZennio Z38 -> Panel with tactil display, ambient thermostat, IR receiver and binary inputs.
- IRSC Test -> Application developed to simulate the operation of an Air Conditiong split unit showing on the Z38 display the status information. This way, integrators can test the IRSC performance without phisically having a Split unit.
Ref: "ZN1VI-TP38i" Touch Panel Z38i
- InZennio Z38i -> Panel with tactil display, ambient thermostat, IR receiver and binary inputs.
- IRSC Test -> Application developed to simulate the operation of an Air Conditiong split unit showing on the Z38 display the status information. This way, integrators can test the IRSC performance without phisically having a Split unit.
- IRSC Open Capture ->Application specifically developed to capture infrared frames from IR remote controllers.
Ref:"ZN1VI-TPZAS" touch controller ZAS
- ZAS -> This application groups the functionality of the controller in a Menu, which is divided in several submenus (Thermostat, Security, Scenes, etc.). It is possible to configure the functionality of up to 8 buttons in total, which carry out different actions, according to the ETS configuration.
- Roll-ZAS -> Add even more versatility to the room controller. The information is divided into pages (up to a total of 4 direct-action button pages, besides specific pages, such as Security, Configuration, etc.). In every button page, it is possible to configure up to 8 buttons (32 buttons in total), which will carry out different actions, according to the ETS configuration.
Ref: "ZN1IO-AB40" ActinBox QUATRO
- ACTinBOX QUATRO -> KNX Actuator combining 4 x 16A multifunction binary outputs (individual or shutter channel) with multioperation logical functions
- ACTinBOX QUATRO Fan Coil Controller -> Application developed to control 2 pipe Fan Coils.
Ref: "ZN1IO-AB60" ActinBox MAX6
- ACTinBOX MAX6 -> KNX Actuator combining 6 x 10A multifunction binary outputs (individual or shutter channel) with multioperation Logical Functions
- ACTinBOX MAX6 Fan Coil Controller-> Application developed to control 2 or 4 pipe Fan Coils + 1 General purpose output
Ref: " ZN1DI-RGBX3" Lumento X3
- LUMENTO X3 RGB -> joint control over one tricolor (RGB) LED module.
- LUMENTO X3 LED -> independent control over up to 3 monocolor LED modules.
Ref: " ZN1DI-RGBX4" Lumento X4
- Lumento X4 RGB -> joint control over one LED module of 4 colors (RGBW).
- Lumento X4 LED -> independent control over up to 4 monocolor LED modules.
- Lumento X4 WHITE -> control over two WHITE LED modules of 2 channels (warm white and cold white).
Ref: "ZN1CL-IRSC" IRSC
- IRSC Plus -> Designed to control Air Conditioning Systems with an IR receiver, including splits, ducted units with IR interface, or those to which one can be adapted.
- IRSC Zone -> Application Program specifically developed to control Air ducted zoning systems (up to 8 zones) con grilles and/or motorized gates.
- IRSC Open -> Application specifically developed to carry out an IR control via the KNX system. After analyzing theorders emitted by the infrared remote control, these orders can be send from any device in the KNX installation.
Ref: "ZN1RX-SKXOPEN" SKX-OPEN
- SKX Open -> Allow controlling devices with a RS232 port via KNX. Basic funcionality offers "1 bit" objects and a maximum frame length of "10 bytes".
- SKX Advance -> Allow controlling devices with a RS232 port via KNX. Advanced funcionality offers "1 bit", "1 byte" and "14 bytes" objects and a maximum frame lenght of "29 bytes".
Ref: "ZN1IO-KES" KES
- KES 3xSingle-Phase -> Allow monitoring up to 3 single-phase electrical circuits independently.
- KES 1xThree-Phase ->Allow monitoring 1 three-phase electrical circuit.
What does safe mode mean?
When a device is running in safe mode the programming LED blinks in red, meaning that the application program is halted.
How to set a device in safe mode?
To activate the safe mode, keep the programming button pressed while connecting the device into the KNX bus. This process is described in the datasheet of the device.
How to exit from safe mode?
To exit from safe mode, simply plug the KNX bus into the device but do not press the programming button this time. This way the programming LED does not blink, meaning that the application program is running (safe mode is not active).
How do a download in safe mode?
When an incidence is caused during the download, it is recommended to do a safe mode download, to ensure that the previous corrupted download doesn’t affect to this new download:
To do a download in safe mode, you should follow the next steps:
- Disconnect the device from KNX bus.
- Connect the device to KNX bus while holding down the programming button. The programming LED will start blinking indicating that the device is in safe mode.
- Once in safe mode, download the application program completely to the device.
- When the download is finished, disconnect and reconnect the device from the bus.